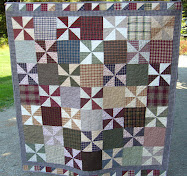
Thursday, May 19, 2016
Brand New Sew Along! A Primitive Garden
Wednesday, May 18, 2016
Home For The Holidays Quilt ~ Finished!
Tuesday, December 22, 2015
The Schedule - Home For the Holidays Sew Along
~Your assignment for each week starts on January 1st. You'll have a new assignment every Friday.~
January
1st - Cut out fabric (this is for your pieced blocks only, do not cut border fabrics yet)
8th - Sew 3 of the red/tan triangle blocks
15th - Sew 2 of the green/tan blocks for applique
22nd - Applique and embroider tree block
29th - Applique and embroider angel block
February
5th - Sew 2 of the red/tan triangle blocks
12th - Sew 3 of the green/tan blocks for applique
19th - Applique and embroider holly block
26th - Applique and embroider stocking block
March
4th - Applique and embroider St. Nick block
11th - Sew 3 of the red/tan triangle blocks
18th - Sew 2 of the green/tan blocks for applique
25th - GRACE WEEK- Use it to catch up, or simple enjoy Easter with your family
April
1st - Applique and embroider house block
8th - Applique and embroider candy cane block
15th - Sew 2 of the red/tan triangle blocks
22nd - Sew 3 of the green/tan blocks for applique
29th - Applique and embroider candle block
May
6th - Applique and embroider manger block
13th - Applique and embroider ornament block
20th - Sew 3 of the red/tan triangle blocks
27th - Sew 2 of the green/tan blocks for applique
June
3rd - Applique and embroider reindeer block
10th -Applique and embroider gingerbread man block
17th -Piece blocks and rows together
24th -Cut border fabric and attach borders to quilt top
-Now, cut your batting and backing fabric (remember that Chris at The Hometown Quilter has fabric for your backing if you need it) and start quilting!
Wednesday, December 16, 2015
Home for the Holidays Sew Along
Monday, January 5, 2015
Monday Morning Sewing Logic
Monday, April 14, 2014
A Hand Quilting Finish
Monday, March 31, 2014
Hand Quilting
Wednesday, March 26, 2014
An Overdue Update
Monday, March 25, 2013
The Quilter in Me
I'll be 35 this year so I guess that puts it at around 15 years.
So I own this. It has been the most wonderful "simple" machine I've ever had. It has so many wonderful features and allows you to FMQ! The only problem is the throat size. This machine works o.k. with a crib sized quilt but anything larger is just too much. If the throat were about 3 times larger it would be, in my opinion, the most wonderful sewing machine of all time.
Tuesday, August 28, 2012
Some Summer Sewing
Here's an apron I made. (Pattern from here.) My dearest girl friend and I both decided to make this apron together. I think that we started them last winter?? I don't remember. All I know is that we finally brought our aprons back out a few weeks ago and I finished mine. Just in time too because this Gathering Apron is a winner for harvesting in the garden!
Friday, April 27, 2012
Twirl Skirt
Monday, April 25, 2011
The Easter Dress and Colored Eggs

The dress is from this pattern. 
The dress went together quickly and was easy to sew. I have found that I really enjoy sewing clothes. It's not like quilting. While cutting fabric for quilting you don't even want to be 1/8" off otherwise your points don't line up and your blocks are off. While I'm not suggesting that cutting clothes is just a bunch of hap-hazard cutting, it doesn't seem to need to be as precise. It seems more stress free!


Wednesday, April 20, 2011
a little homemade skirt
Here are the photos that I took this gloomy, rainy morning.


I only had 1 yd of fabric (or maybe a little less) to make this so my back ties didn't come out to be as long as in the tutorial- or even as long as I'd like. But they'll do.
I would certainly make this skirt again. It's a winner!
Wednesday, February 16, 2011
Bind-A-long; Binding a Quilt- Part 1
472" (perimeter)/42" = 11.24" That means I need at least 11.24 strips of binding cut.
11.24" x 2.25" (desired width) = 25.29" That means I need just under 3/4 of a yard of fabric to make my binding.
I'm going to cut 12 strips and then trim off the selvage from each strip. If my # of strips had came out closer to 11.90 I may make sure that I have enough fabric to cut one additional strip, if needed later, bringing the total to 13 instead of 12. We're going to be mitering the corners of our binding and you'll loose a little length in sewing the strips together so we want to be sure our binding isn't going to end up just inches short of completion. It's always better to err on the side of caution here. We're talking 1 extra strip, maybe $0.45 of fabric here folks, don't hesitate to cut an extra one. You can add it to your scrap pile later if you end up not using it.


Once my strips are cut, I'll start sewing. You can sew your strips together with right sides together like this, making a regular straight stitch down, using a 1/4" allowance:

But I prefer to angle my fabric like this and stitch from one corner to the next:

When you're folding the binding over and stitching it, it doesn't leave such a big wad of fabric (from the seam allowance) in one section.
Stitch it on the diagonal, stitching each strip to the previous one. I like to chain piece my biding since it goes quicker but do whatever is comfortable for you. You can also pin this if you feel like it may slip to much while running it through your machine.


Then trim off the little triangle that's left using a 1/4" seam allowance.


Press your seam allowances and then fold your binding in half and press on the fold.

I like to then roll my binding up to keep it tidy until I'm ready to attach it to my quilt.
That's it! Wasn't that simple? You just made your binding- congratulations!We'll work on sewing the binding on to our quilts in the next post. I'm going to take my time with these how-to posts for 2 reasons. One, to allow ladies who haven't made a binding before to not get left behind. And two, because I am binding a Cal-King quilt and it's just going to take a bit for me to get it done! Maybe I should have started with a table runner. ;)
Remember that if you have any questions you can leave a comment here. I'll answer them here as well just in case someone else has the same question. Or if you need more in depth help, you can email me mountainhomequilts@charter.net.


