Friday, July 29, 2011

unripe peaches


"Sometimes it's hard for a little monkey to be patient."

Thursday, July 21, 2011

learning beekeeping

Since I've been a little absent here on the blog (come on, 2 posts in June??) I've failed to update quite a bit of things; one of them being beekeeping. If you follow me on Facebook then you already know part of this story.....We fell into it one Saturday evening in May. Actually, our 4 year old got us started. Sounds strange, doesn't it? I'll try and keep the story short.
Layton (said 4 year old) had "parked" his bike next to our bird bath one sunny afternoon. That evening as we were all outside he went to get his bike and came back to daddy and said, "Dad, there are a bunch of bees in the back!"


Daddy went to look and then called Mommy (that would be me.) What happened next?
Chaos ensued! Here were free bees sitting in our backyard. We needed to capture the swarm- and fast. Thankfully my in-laws, who live about 8 miles away, have always wanted to keep bees and have a STOCK of supers (bee boxes) and frames. Someone had given the equipment to them a couple years ago and it had just been sitting unused. I dashed over, got the stuff we could use and raced home.
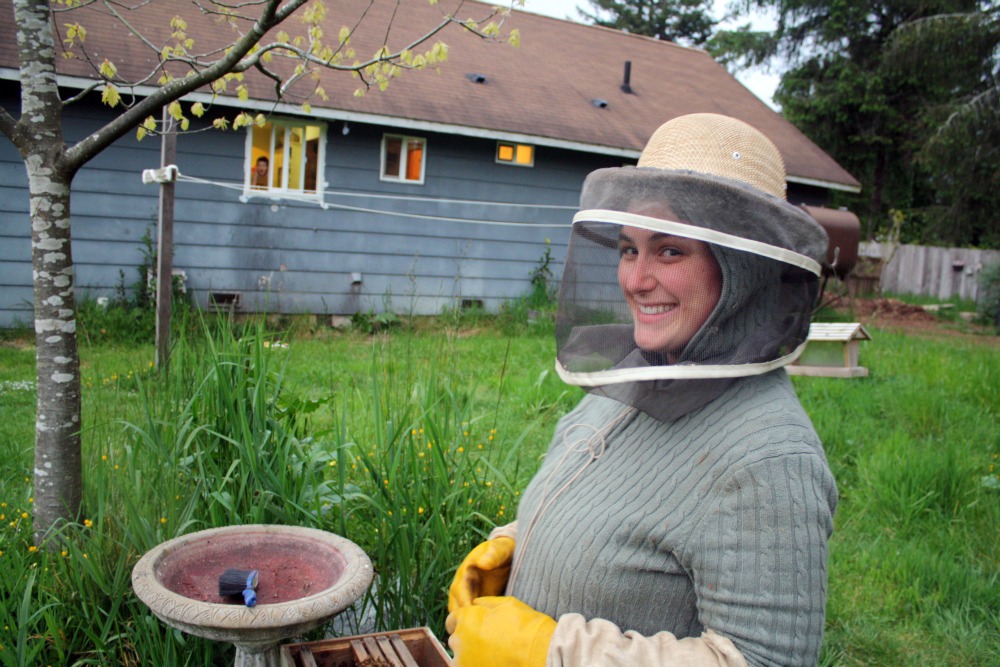
One problem....we had no foundations to put into the frames, we knew nothing about bee keeping and we had a swarm that was going to leave if we didn't do something quickly. I looked up natural beekeeping on the internet to try and figure out how we could go foundationless. I figured it out and we set up 5 frames in the super. (A super normally takes 10.) We then took the box outside and placed it under the bees. I took a hand broom and wearing my bee veil and gloves (also borrowed from the in-laws) I swept the bees into the box. It worked! We closed the lid a little while later and found ourselves the proud owners of a small colony of bees.


Yay! We did it!


I promptly ordered more bee gear, for the bees and me, and read book upon book about beekeeping.
I'd love to say that the story ended there and that the bees were happy go lucky little girls (and a few boys) that lived happily ever after, but it doesn't. Let me say that there is nothing like jumping head first into something that you know little to nothing about to teach you what NOT to do.
First, make sure you put ALL the frames into the box. I left a hole, or lack of frames, so that the bees would get all the way into the box. Don't do that- don't worry, the bees will find their way down in between them. Leaving a hole like that (the part where no frames were) encourages wild comb to be built. And boy, did the bees ever build it! When I went to open the hive to check on the bees a week later, they had built a bunch of wild comb from the inner lid down and when I removed the lid by pulling it across (#2 lesson learned-always just pull the lid up!) it broke all the wild comb which landed on the bottom of the hive in a heap.
The next day the bees promptly moved out.
Thankfully, they swarmed just over to the trampoline where we caught them again and this time, put them in a correct box.
The bees have stayed happy in that box, so far- and it is July?, so I'm hoping that all is well. I check on the ladies and gents usually about once a week, just to see how everything is going.


Bees in their new, permanent home!


The bottom super is looking as though it's filling up nicely and I'll be adding a western super on top of it in the next month or so.
I'm still learning, still making mistakes and praying that in a year or so I'll at least have the basics mastered. Sitting outside the hive and watching the bees is mesmerizing. I am so thankful that the Lord blessed us with a spring swarm!


Don't forget to enter the giveaway for the homesteading book in the post below!

This post is linked to the Barn Hop!

Wednesday, July 20, 2011

The Homesteading Handbook- Review and Giveaway*CLOSED*

When I got these books from Skyhorse Publishing, I chose to read The Homesteading Handbook first because it intrigued me the most. Now that I have read through it I have to say that I am both impressed and not impressed at the same time. Is that possible? Here are my pros and cons of the book....The Pros: (isn't it better to start off with the good news?)
- This book covers nearly everything. Seriously. I was AMAZED at how many topics it covered. We're talking, gardening, canning, drying, freezing, edible wild plants, all types of poultry, beekeeping, goats, sheep, llamas, building doghouses, birdhouses, poultry houses, fences, bridges, workshops, smokehouses, root cellars, small barns, using alternate forms of energy in the form of hydro power, solar power, wind energy, making things like candles and soap, knitting, pottery, herbal medicine and first aid. PHEW!! Did you get through all that? Really there is a lot covered in this book.
- The photos in the book are great. Nice shots with great color!
- The section on "Edible Wild Plants and Mushrooms" was a fantastic addition. I haven't seen a homesteading book yet that included it. Along with pictures, descriptions, locations and "edible parts and preparing" notes.
- I was also impressed with the canning section. Lots of great information. It's like a canning book inside of a homesteading book.


-Llamas. Most books don't even mention them. If you're an avid knitter, how great would it be to spin your own yarn?
- Cheesmaking! While there are only a couple recipes in the book, they are all that I would need to start off...mozzarella, cheddar, the book even has instructions on making a simple cheese press.

The Cons:
- Because the book covers so many topics in only 268 pages, each topic is covered very briefly. If you're looking into raising honeybees then this book is not going to be sufficient, even though it has a section on them. The section on turkeys talks about having a male and female to have offspring but fails to mention that only certain breeds of turkeys can reproduce without "help." If you're looking for a book on a certain topic like raising goats, building barns or even gardening, a specialized book would better suit your needs.
- There is not one thing in this book on cows!?? Whether for milk or meat.
- There is nothing in this book on wild game or hunting. Elk, deer, jackrabbits, etc. Really going "back to basics" would certainly include obtaining meat from other sources than the grocery store.
- There is nothing on rabbits. My new love of rabbit meat, their ease of butchering and raising has got me wishing that this book covered them.

All in all, the book is far from perfect....but most homesteading books are. They may cover one topic very well (in the case of this book, I'd say it's canning) and leave much to be desired on others. If you're into canning, building smokehouses and would like a general knowledge on most farm things, then this book would certainly work for you!

I'll be giving away one copy of this book to one reader. If you'd like to enter the giveaway here's what you need to do for one or more entries:
1. Leave a comment telling me what homesteading skill you'd most like to learn
2. Post this giveaway on your Facebook page and then leave another comment letting me know that you did
3. Blog about this giveaway (it can be as simple as, "Look! Here's a giveaway!" with a link) and then leave another comment letting me know that you did

The giveaway will close on July 31st at 7pm (PST) The winner will be announced during the first week of August. Please make sure that you leave a way for me to contact you, or make sure that you are checking back during that first week to see if you've won! I'll also announce the winner on my FB page.
Happy entering!

Monday, July 11, 2011

camping + organic homemade marshmallows

We had a great time camping this past weekend.


The solitude, the creek, the family, sleeping on the hard ground (oh wait, that wasn't one of the highlights!) and...........the marshmallows.


Now I like s'mores fairly well. I'm certainly up for making one but that's about it. Maybe I'm lazy and the actual roasting part takes too long, or maybe it's the knowing that I'm ingesting all kinds of horrible yuckiness that is a store bought marshmallow that makes 1 my limit. I'm going to say that it's a combination of both.


So I decided to try my hand at making my own. I think the first words out of my mouth around the campfire on Saturday morning were, "Is it too early to make s'mores?" Seriously people. They are THAT GOOD. Here's why:

1. The roast incredibly fast. You can nicely brown them and get them to a good smooshy consistency.

2. They don't catch on fire. Kinda makes you wonder about what's in those store bought ones that's so flammable, 'eh?

3. They taste sooooooooo much better!

4. They're super easy to make!

5. Your kids (or you) can eat 10...... I mean 2, without feeling that guilty, "I shouldn't be eating this/feeding this to my kids" feeling. Well, sort of. Granted you are feeding your kids a bunch of sugar, which really is never good but the occasional campfire treat isn't going to kill em.


The verdict?


YUM.


Here's the recipe I used,
3 TB unflavored gelatin
1 cup ice cold water, divided
12 ounces organic granulated sugar, approximately 1 1/2 cups
1 cup organic light corn syrup
1/4 teaspoon sea salt
2 teaspoons organic vanilla extract
1/4 cup organic confectioners' sugar
1/4 cup organic cornstarch
Organic butter
(you can omit the cornstarch if your confectioners' sugar already has cornstarch in it)
Directions
Place the gelatin into the bowl of a stand mixer along with 1/2 cup of the water. Have the whisk attachment standing by.

In a small saucepan combine the remaining 1/2 cup water, granulated sugar, corn syrup and salt. Place over medium high heat, cover and allow to cook for 3 to 4 minutes. Uncover, clip a candy thermometer onto the side of the pan and continue to cook until the mixture reaches 240 degrees F, approximately 7 to 8 minutes. Once the mixture reaches this temperature, immediately remove from the heat.

Turn the mixer on low speed and, while running, slowly pour the sugar syrup down the side of the bowl into the gelatin mixture. Once you have added all of the syrup, increase the speed to high. Continue to whip until the mixture becomes very thick and is lukewarm, approximately 12 to 15 minutes. Add the vanilla during the last minute of whipping. While the mixture is whipping prepare the pans as follows.

Combine the confectioners' sugar and cornstarch in a small bowl. Lightly coat a 13 by 9-inch metal baking pan with butter. Add the sugar and cornstarch mixture and move around to completely coat the bottom and sides of the pan. Return the remaining mixture to the bowl for later use.

When ready, pour the mixture into the prepared pan, using a lightly oiled spatula for spreading evenly into the pan. Dust the top with enough of the remaining sugar and cornstarch mixture to lightly cover. Reserve the rest for later. Allow the marshmallows to sit uncovered for at least 4 hours and up to overnight.

Turn the marshmallows out onto a cutting board and cut into 1-inch squares using a pizza wheel dusted with the confectioners' sugar mixture. Once cut, lightly dust all sides of each marshmallow with the remaining mixture, using additional if necessary. Store in an airtight container for up to 3 weeks.


Enjoy!

Thursday, July 7, 2011

book reviews + giveaways

I am super excited to share this post with you! The nice folks over at Skyhorse Publishing have asked me to review and giveaway a few of their publications, which I gladly accepted. Look what came in the mail today...
I'll be reviewing The Homesteading Handbook this month and giving away a copy. In August I'll review Beekeeping and giving away a copy. Then in September I'll review The Joy of Keeping a Root Cellar and give away a copy of it too. Which of the books is the most or least appealing to you?
I am really looking forward to 3 months of great reading, sharing my thoughts with you and sending these 3 books to 3 lucky winners. I hope you'll stick around!
Related Posts with Thumbnails