
Welcome to Memorial Day! I hope that you can find some time today to be thankful. Thankful for the life that you live, for the freedoms we have and thankful for the country you live in....all by the grace of God and the soldiers that have fought and died, fought and lived and are still fighting today. Hug a soldier or a vet today and say, simply, "Thank you."
This morning I headed over to random.org, put in the info needed and here is what it came up with:
Random Integer Generator
Here are your random numbers:
31
Timestamp: 2010-05-31 08:19:03 PST
That means that Anne, you're the winner!
I'll be emailing you to get your information! Thanks to everyone who entered. I hope that you were encouraged by the Franklin Springs Family Media website and found some videos that interested you. It is so nice to be able to find wholesome, family movies nowadays! I was actually encouraged by many of you to delve deeper into their site. I ordered the Farm and Family Pack yesterday and can't wait to watch them with the whole family!
Monday, May 31, 2010
Thursday, May 27, 2010
Homesteading 101

This summer I'm going to be doing a series of posts that cover a wide range of homesteading skills. Each month we'll cover a new topic and I'll post information a couple days a week that specifically relates to that topic. The schedule will be as follows:
June: Bread Making 101
July: Soap Making 101
August: Canning 101
September: Quilting 101
I hope you'll join me looking deeper into the skills that make your homestead, a home.
Wednesday, May 26, 2010
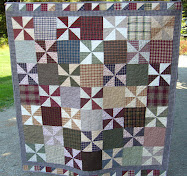
Homestead Blessings - The Art of Quilting - Giveaway! *CLOSED*
The generous folks over at Franklin Spring Family Media have allowed me to give away one copy of The Art of Quilting, hosted by the West Ladies, here on my blog. How exciting! This video is sure to encourage you by sharing a host of quilting skills and techniques. If you're just learning to quilt or haven't yet got up the courage to start, this video is for you!
Here's how you can enter:
1. For your first entry, head on over to Franklin Springs Family Media and browse through their selection of videos. Then come back and leave a comment about which video or video pack looks the most appealing to you.
2. For an additional entry, blog about this giveaway or share the link on your facebook page and leave an additional comment letting me know that you did.
This giveaway will be open until Sunday, May 30th at midnight.
Tuesday, May 25, 2010
kraut and co-ops
I just purchased these 1 gallon jars from our co-op, Azure Standard, last month. They are perfect for making sauerkraut. 2 large heads of cabbage fit inside perfectly. Cindy gave me a great tip on fermenting your kraut; to help hold the chopped cabbage down, use an entire leaf to cover the top! It works fabulously. This morning I chopped all my cabbage up, squished it into my new jar and placed a leaf over the top. Then I used a 1/2 pint, wide mouth mason jar to put pressure on the cabbage, making sure it all stays below the salt water. Screw on the lid and in about 2 weeks this kraut is going to be delicious!
Do you have a co-op where you live? If you're west of the Mississippi (for the most part) Azure probably delivers to your state! Most of the food that we consume (other than our garden and farmers market) comes from our co-op. I do go to the grocery store, but only once in a while and usually for just a couple things. Shopping with the co-op allows me to save money and time. Getting all the things I need once a month is a blessing! Especially when you live in an area where it rains 3/4 of the year and you have 3 kids, ages 3 and under to take to the store!
Cindy gave me a great tip on fermenting your kraut; to help hold the chopped cabbage down, use an entire leaf to cover the top! It works fabulously. This morning I chopped all my cabbage up, squished it into my new jar and placed a leaf over the top. Then I used a 1/2 pint, wide mouth mason jar to put pressure on the cabbage, making sure it all stays below the salt water. Screw on the lid and in about 2 weeks this kraut is going to be delicious!Do you have a co-op where you live? If you're west of the Mississippi (for the most part) Azure probably delivers to your state! Most of the food that we consume (other than our garden and farmers market) comes from our co-op. I do go to the grocery store, but only once in a while and usually for just a couple things. Shopping with the co-op allows me to save money and time. Getting all the things I need once a month is a blessing! Especially when you live in an area where it rains 3/4 of the year and you have 3 kids, ages 3 and under to take to the store!
Canning lids giveaway

Amy over at Homestead Revival is hosting a giveaway for 6 dozen Tattler re-usable canning lids. I hadn't heard about these before seeing them on Amy's blog and I'm super excited about them! For all the canning that takes place on this homestead every fall, it would be great to re-use the lids on all those Mason jars instead of throwing them away. What a fantastic, green option!
Head on over to the Homestead Revival and enter.
Saturday, May 22, 2010
Giveaway Day winner!
Here's the winner! Thanks to everyone who entered- I absolutely LOVED reading all of your comments and looking at your blogs!
Random Integer Generator
Here are your random numbers:
123
Timestamp: 2010-05-22 13:21:07 UTC
stitchinpenny said...
Thank's for your generosity
May 17, 2010 5:20 PM
I will be emailing you to get your info! If I don't hear from you by Tuesday another winner will be drawn.
Random Integer Generator
Here are your random numbers:
123
Timestamp: 2010-05-22 13:21:07 UTC
stitchinpenny said...
Thank's for your generosity
May 17, 2010 5:20 PM
I will be emailing you to get your info! If I don't hear from you by Tuesday another winner will be drawn.
Friday, May 21, 2010
gardening tips
I've had a few followers of this blog ask me some questions about gardening so I though I'd just share a couple quick tips here in case the information could be valuable to you as well!
1. Know your zone! Your local garden center or nursery will be able to tell you what zone you live in, or you can use this to find out. Different plants grow better in different zones.
1. Know your zone! Your local garden center or nursery will be able to tell you what zone you live in, or you can use this to find out. Different plants grow better in different zones.

2. Know what you can and can't plant. This goes along with #1 but I guess I want to stress it because not everyone can grow, for example, corn. Trust me, I know. This is the first year I did not plant corn. While I may be able to find a breed of corn that grows better in cooler climates, the fact is that corn likes lots of sun and warmth, neither of which we have here. Why am I forcing something that is just not natural? I would especially recommend planting for your area if you're a first time gardener. There's nothing worse than crop failure your first year. It'll make you feel as if your green thumb has turned brown!
3. After careful consideration of sunlight and where it rises and sets, map out your garden on a piece of paper. This will allow you to better plan the placement of your plants or vegetables. Don't go in without a plan or you'll get your pole beans growing so tall they shade your tomatoes for half the day!

4. Seeds should be planted twice as deep as they are large. Example: pole beans are about 1/2" long, they get planted 1" deep.
5. Space your plants out (if you're doing veggies.) A great reference for this is the book Gardening When it Counts. It is better to have a few vegetables with optimal nutrition than 20 of them with little nutrition.
6. If you don't live in an area with a lot of rain and have to water often, mulch your garden. Chips from trees or straw works well. This will help retain moisture in the ground and as a bonus, keep your weeds down!
7. Weed often. Not only is it easier to pull up little weeds rather than big ones but weeds compete with your plants for nutrients.

8. Water deep. When you thoroughly soak your ground at a watering, it benefits you in two ways. First, you don't have to water as often and second, your plants roots will grow down deep into the soil and result in healthier, bigger plants. Shallow watering encourages shallow plant roots and small, weak plants. Watering first thing in the morning is the best time to water. It helps your plants manage the rays of the hot sun during the day and allows for drying time so that nothing is sitting wet overnight.
9. Plant only what you need and in phases. Example; Unless you're feeding a family of 20, two 10' rows of lettuce planted all at the same time is not only going to be way too much but is all going to come ripe at the same time. Plant what your family can eat fresh (can the leftovers) and stage planting things like lettuce or broccoli so that you can eat it as it comes ripe. Planting this way will also save space in your garden, if your space is limited.

10. Grow as much as you can vertically if your garden is space challenged. Choose pole beans over bush beans, trellis anything else you grow that can climb (i.e. cucumbers.)
11. Compost! What a fantastic way to turn your kitchen scraps into nutritious dirt for feeding your plants! Remember to only put raw things into your compost and avoid all meats. You want to add things that rot, not that go rancid. Grass clippings and raked leaves make for excellent additions to your compost bin. Try to have your bin in a somewhat sunny location (heat is what makes the contents turn to dirt.) Turn your compost regularly with a pitchfork and if it looks as if it's drying out too much you can add water. We don't have that problem here in the pacific northwest. Things actually take longer to break down because of the cooler temps and lots of rain!
12. Go organic! If you're starting seeds (which I would recommend, they're less expensive and easier than you think to start) or purchasing starts, try and buy organic ones. Research the types of plants and bugs that you can add to your garden (yep, you can even buy beneficial bugs) to eliminate the need for chemical bad bug control. You can also create a space near your garden to act as a buffet to draw in birds that like to eat all those pesky little bugs. Use things like natural fertilizers and compost to feed your plants on a regular basis.

13. Finally, know that gardening is learned through trial and error and that even after years of gardening you'll still be learning and trying new things. Enjoy your garden and the bountiful harvest you'll be able to reap throughout the growing season!
Thursday, May 20, 2010
It's a blessing!
My sweet husband bought me the Homestead Blessings pack of videos for Mother's Day and I love them! If you love homesteading and have the basic skills down, then these videos are great for you. My personal favorites so far are the Art of Gardening, the Art of Herbs and the Art of Bread Making. This is the first year that I designated a place in the garden for just herbs and the herb video was super encouraging!
I got an email this morning sharing that the entire series is on sale now! 10 videos for $99. The set includes the newest video, the Art of Quilting. My set did not include that video but I think I can pass on that one, I've got a couple quilts under my belt. *wink*
I got an email this morning sharing that the entire series is on sale now! 10 videos for $99. The set includes the newest video, the Art of Quilting. My set did not include that video but I think I can pass on that one, I've got a couple quilts under my belt. *wink*

I'm not affiliated with this company at all but I just wanted to share the blessing that it has been to me and hope that it would be the same for you!
Tuesday, May 18, 2010
Rendering Lard
Lard is a great source of fat to use in all kinds of cooking, baking and even soap making! If you raise your own pigs or even buy pigs to slaughter, you can ask the butcher to make sure that he saves you all the pig fat off your pig. There will be a lot. Depending on the size of your pig, probably about 6-8 quart jars full of lard when you're done rendering all of it.
 To make lard, you'll need a couple supplies:
 Pig fat (that's a given I think)
Some source for heating it slowly. I use a crock pot but others have used their oven or stove top.
A couple bowls and jars
A strainer and some cheesecloth
Step 1: Cut up the fat. You want to clean the fat of any leftover meat or skin and cut it into apx. 1" pieces. Your pieces should be white. Depending on how good your butcher is, or isn't, you may need to trim a lot off.
 Pieces, like this one above, need to be cleaned up quite a bit. You don't want to be cooking meat along with your fat.
Step 2: Cook the fat. I like to do mine in the crock pot on low or warm. You're going to cook it for about 12 hours, stirring occasionally. As it cooks the chunks will melt down into a liquid.
Not everything will melt down though, in my experience. You will still be left with a little at the end that looks like this: Step 3: Strain the fat.
You'll want to strain all the liquid off of the remaining mush through a strainer and into a bowl. Don't worry about any little bits that get into the liquid at this point, we're going to do a second straining later. If a lot of fat chunks are left you can continue to melt those down in your crock pot for another few hours.
I would recommend using, if you have one, a large glass bowl to place your strained liquid fat into.
Then, add 1-2c of water to your liquid fat.
Refrigerate over night.
Step 4: Skim off the lard.
Letting the liquid cool over night will allow it to separate into lard, on the top, and the water and bits of fat (that went through the strainer) on the bottom.
 You want to clean the fat of any leftover meat or skin and cut it into apx. 1" pieces. Your pieces should be white. Depending on how good your butcher is, or isn't, you may need to trim a lot off.
 Pieces, like this one above, need to be cleaned up quite a bit. You don't want to be cooking meat along with your fat.
Step 2: Cook the fat.
 I like to do mine in the crock pot on low or warm. You're going to cook it for about 12 hours, stirring occasionally. As it cooks the chunks will melt down into a liquid.
Not everything will melt down though, in my experience. You will still be left with a little at the end that looks like this:
 Step 3: Strain the fat.
You'll want to strain all the liquid off of the remaining mush through a strainer and into a bowl. Don't worry about any little bits that get into the liquid at this point, we're going to do a second straining later.
 If a lot of fat chunks are left you can continue to melt those down in your crock pot for another few hours.
I would recommend using, if you have one, a large glass bowl to place your strained liquid fat into.
Then, add 1-2c of water to your liquid fat.
Refrigerate over night.
Step 4: Skim off the lard.
Letting the liquid cool over night will allow it to separate into lard, on the top, and the water and bits of fat (that went through the strainer) on the bottom.
Now it's time to scrape off the lard. I made the mistake of using a large stainless steel pot this time. Since the bottom is so wide on the pot, it makes it difficult to skim off the lard once it's cool. As you can see from the picture below, some of the leftover chunkiness had to be scraped from the lard.
 Step 5: Melt down the lard in a pot.
 You're going to melt down all the cooled, hardened lard in another pot till it reaches a liquid form. Then place a cheese cloth (or thin cotton dish cloth) over a strainer and pour your lard through the cloth. This will catch any of the last tiny little bits of fat and give you a nice clean lard.
 Step 6: Pour your lard into jars.
 Place a lid on the jars and store in your fridge. You can store it in your fridge for up to a year. If left out on a shelf, maybe for 4-6 months. You can also freeze your lard.
 I made the mistake of using a large stainless steel pot this time. Since the bottom is so wide on the pot, it makes it difficult to skim off the lard once it's cool. As you can see from the picture below, some of the leftover chunkiness had to be scraped from the lard.
 Step 5: Melt down the lard in a pot.
 You're going to melt down all the cooled, hardened lard in another pot till it reaches a liquid form. Then place a cheese cloth (or thin cotton dish cloth) over a strainer and pour your lard through the cloth. This will catch any of the last tiny little bits of fat and give you a nice clean lard.
 Step 6: Pour your lard into jars.
 Place a lid on the jars and store in your fridge. You can store it in your fridge for up to a year. If left out on a shelf, maybe for 4-6 months. You can also freeze your lard.
Sunday, May 16, 2010
Yay! for Giveaway Day!
I love Giveaway Day! It's always so fun to check out other blogs and see the extreme generous and crafty nature of fellow bloggers.
I am thrilled to be participating once again in Sew Mama Sew's special day! Here's what I've got up for grabs:
1 Snippets by American Jane Turnover
1 Boutique by Chex Moi Charm Pack
1 26' roll of Stipples Made Easy (the stiple and star pattern)

All of this to one lucky winner!
To enter, leave a comment below. If you blog about my giveaway, leave an additional comment and I'll give you two more entries! Wow, that's 3 entries total!
Rules: I'm sorry but the entries are limited to the USA only. All comments must be made by Friday May 21st at 6pm (PST) to qualify. Winner will be drawn on Saturday May 22nd. Please leave a way for me to contact you (like an email.) If I can not contact you, another winner will be drawn.
patterns for pups

Wow, I bough these about 10 years ago with very good intentions. Nothing ever came of those intentions though so I'd like to get rid of them. I'll pay the postage on these since they're fairly inexpensive to ship. Would anyone like them? They're new in package, unused and uncut.
Oh, and don't forget that tomorrow is the Sew Mama Sew giveaway day! I'll be giving away a neat little package of goodies. Check back in tonight to see what I'm giving away!
Friday, May 14, 2010
Burst of Autumn Quilt kit
Here's another up for grabs! I bought this older Moda kit off ebay and the condition it is currently in is the same that it came in, half precut. There are cuts that are already pinned together and fabric that has not been cut. I bought it 2 years ago and I don't see myself getting to it in the next 2. So, if you'd like to pay the shipping. My guess (from my previous post) is that Flat Rate Priority Mail in the US is going to be the cheapest (around $11-16 depending on what type of box I can get it in.) This kit makes a 74x80 quilt.
 Any takers for this one?

 Any takers for this one?
 Thursday, May 13, 2010
dick and jane fabric
This fabric is up for grabs to the first person who doesn't mind paying to have it shipped to them! :)

Any takers?
guess who's here?

My mom! She got in last night and we are going to be spending the next week cleaning and de-cluttering the house! I am sooooo excited! So, I may be MIA for a bit. I'll be back soon though- just wanted to let you know that I didn't fall off the face of the earth!
Check in with me here to see what I'm getting rid of--incase anyone wants my stuff! LOL
Tuesday, May 11, 2010
improving the chicken coop
My husband built our chicken coop 5 years ago. We knew nothing about chickens or "chicken farming," as hubby likes to call it. We knew nothing about coops or what we should or shouldn't do. So we jumped in and built what we thought would be good. If we had consulted a book or some other people it may have turned out differently. It has been a great coop but we've decided, from experience, that it's time to make a few changes. I'm hoping that this post will be an encouragement and offer some helpful advise if you're just starting yours.
Here's what we have to work with and what we're doing to improve.
First, here is our coop in it's current state. It's about 8' x 14' in size.


This picture below was the first of our problems. Not having any way of separating chickens in the coop. If you are building your first coop may I suggest that you build a section IN your coop to be used for new chicks (that aren't raised by a mama hen) or a hurt/sick chicken. Right now we are just using a dog kennel fence to keep our smaller chicks and turkeys separate. My plan is to never do chicks again (that I have to take care of.) We'll be getting a rooster in the next 2 years and I'll let things happen naturally to gain more chicks so, we are not planning on adding any other kind of room in our coop. If you like raising chicks or don't want a rooster then I'd recommend the separate area.


Laying boxes. Make sure you have plenty. I think we have 9- which for us works. What doesn't work is that the sides of the boxes are so low that they don't create enough privacy for the hens...and hens like to do their business in private. So, they argue over the 2 end ones that are next to the wall and refuse to use the others. We'll be removing the dividers this summer and replacing them with much taller dividers so that all the boxes can be utilized.

Our roof. It's a mess. We did do one thing right in building our coop, we made it very open air. Unfortunately it's a little too open air. We only put a roof on about 1/3 of it thinking that the chickens would have plenty of sunshine streaming into the coop and that there was enough cover, if they needed, to get out of the elements. Wrong. Our chickens like to roost on the furthest beam (the one shown below, with no roof above) and along with their food and water being constantly ruined by the elements (i.e. rain,) they were apparently not smart enough to come in from the rain. So we put up a temporary tarp. A 5 year temporary tarp. It's now ripped and ugly and it needs to go. We'll be fully roofing this coop this summer.

We have 2 ramps leading from the ground up to the boxes for the chickens. While they could just jump up to the ledge and then get into the boxes, we felt like spoiling them and giving them walkways. We noticed though on one of them that the chickens were having trouble gripping (since the boards are fairly steep) so my husband nailed wire to it so that their feet could easily grip the path.

One great thing that my husband did do while first building the coop was to dig the perimeter deep. That way we were able to actually bury the chicken wire to keep critters from digging under to get in. We also layed a bunch of smaller river rock and even a little concrete in the ditches to make it ultra raccoon proof.
Lastly, the chicken run. It's a sad thing. Our chickens have always been full free range. They have had complete run of the acre but with the arrival of quite a few new neighbors, we seem to have a dog issue. And it's not a good thing, so we're fencing them in. There will, however, be a couple benefits to it.

Benefit #1: No more egg hunting in the summer. Hunting eggs can be left for Easter only. There's nothing worse than one, or more, of your hens deciding that she likes the back 40 better than the chicken boxes and she's going to lay all her eggs there. Remember, I said that hens like things private.
Benefit #2: The poop. While having 3 hens on one acre isn't bad, having 9 hens and 2 turkeys is gross. Poop. Everywhere. This way, the kids can go barefoot, babies can crawl around and sitting in the grass can happen without having to carefully examine the grass first to make sure that you won't be sitting in poop.
Benefit#3: Not having to sit out with a loaded gun all day waiting for dogs to come by.
We are building it large enough to offer plenty of sunshine along with grass to our chickens. Once in while I will let the chickens out to roam the entire property again but will try and keep their visits fairly short. When the run is complete, I'll post a picture.
Wings will need to be clipped on a regular basis (every 2-3 months) to keep them in the run since our fence is only 4 feet tall. Clipping a chickens wings is a quick, simple and non-painful task. After the run is built and I have to do mine, I'll do a tutorial here on how to do it.
Monday, May 10, 2010
wooden spoons
I love wooden spoons. Almost as much as I love bowls. I have about 7 that I use on a regular basis. Unfortunately for my spoons, I am once in a while in a rush and I commit the greatest sin that you could commit when it comes to them. I put them in the dishwasher!!! I know, I know, bad. They come out feeling all rough and dry.
I like to revive them by rubbing oil on them. My personal favorite is coconut oil but I'm sure olive oil would work well too. Take one wooden spoon in need of some love (as pictured above) and get a nice glob of coconut oil on your hands. Start rubbing it in. Take your time, evenly coat the spoon and then place the spoon in an area (like the dish rack on your counter) to dry. In about 15 minutes the oils will have seeped into the wood and the spoon will be revived and feel smooth. Much nicer to handle!
 Take one wooden spoon in need of some love (as pictured above) and get a nice glob of coconut oil on your hands. Start rubbing it in. Take your time, evenly coat the spoon and then place the spoon in an area (like the dish rack on your counter) to dry. In about 15 minutes the oils will have seeped into the wood and the spoon will be revived and feel smooth. Much nicer to handle!
Sunday, May 9, 2010
another giveaway- a little late

I know I'm late on this one and you probably only have a couple hours left to enter....maybe 12. But I had to share that Cathy is giving away one of her custom dolls on her blog! Now, these are super cute and so well made. I know, I own one! Here's the link to enter. Enjoy and good luck!
Saturday, May 8, 2010
embroidered giveaway!

Karen over at Humble Needle is giving this gorgeous hand embroidered piece away! I was torn on whether or not I should actually share the news because I really want to win it but I figured I should share the love! Head on over and enter!
Thursday, May 6, 2010
beet kvass
I am just getting around to posting this now although I made my beet kvass about 3 weeks ago. I figured better late than never, right?
Let's start off with the truth: Sally Fallon calls this drink, "something you wouldn't serve to guests." I'd say she is stretching the truth a little there. While the drink has amazing health benefits (aiding digestion, liver cleansing, blood tonic, promoting regularity, etc.) I find it hard to even serve to myself. I'd consider myself a fairly fermented liking gal. Or, in other words, I like fermented foods. I really love kraut and kefir especially. YUM! But this drink is gonna take some getting used to.
The first thing you're going to needs is beets. Good, organic beets; 2-3 depending on their size. Peel and chop coarsely.

Then you'll need 1/4 c whey, 1 Tb of sea salt and apx. 2qts of filtered water. We're on a well so our water is free of things like chlorine and fluoride.

Place beets, whey and salt in a 2qt glass container and fill with water. Stir well and cover securely. Keep on your counter for 2 days.

Now, for some reason Nourishing Traditions always seems to have the "2 day" rule about letting things ferment on your counter. Maybe it's my house temp or our climate but 2 days never cuts it for me. Our kraut sits out on the counter for a good 2 weeks before it's ready. I let the beet kvass sit out a little too long and it started to develop a light scum on the top. I scraped all of that off, strained my beets and placed the tonic into the fridge. It's recommended that you drink one 4oz. class morning and night.
So try not to gag (I know, that doesn't sound very promising,) and drink it for your health!
Wednesday, May 5, 2010
keeping up appearances
 photo from: Shery
Appearances are a funny thing. They can make you think that something is one way when it may be something else entirely.
I've been thinking about posting on this topic for a little while but for some reason, God has just really laid it on my heart this morning.
Do you ever feel the "keeping up with the Jones'" pressure? If you've never heard that expression before it's a lifestyle of having things bigger and better than another person. I see it all the time, even in our small town. Why aren't we happy with who we are and what we have? Why has our culture become a "I HAVE to have this now!" or "This will make me feel better if I have it!", "I'll be more accepted (or popular) if I have this." I'm talking about all people here, not just fellow Christians. God tells us Christians that we are to be satisfied in Him, but even other non-believers should re-examine their needs and wants.
What is it about someone's self-esteem that makes them feel as though they need the big house, and the expensive furnishings, the new trucks and the toys (oh, the toys! the boats and the quads and all the other un-necessaries?) And what example are we setting for our children??
I get a lot of people that say things to me like, "How do you do it all?" "I wish I could do all the things you do." but let me say that appearances can be deceiving. What you see on my blog here is me; there are no made up people, or animals, or ways of life. What you don't see though is the stack of laundry on my couch, the sink full of dishes, the used mini-van that seriously needs to be washed, the grass that needs mowed, the clutter on the kitchen counter. I'm a normal person with a normal life. Those things just aren't fun to blog about! :)
My husband and I live on one acre but are constantly dreaming of more. To get there though we need to keep our priorities in check. Hubby's truck is 11 years old. My van is 6 years old. Our home is small and old. We've never owned a new couch or a new vehicle. We live by the sweat (literally) of my husbands brow. Along with trying to save for something bigger though, we also have to remember that everything in the here and now is just a material possession. Nothing here is eternal. I don't need to have this and this and that to feel good about myself or my family. I am satisfied. I know that we love each other and that God loves us. And like the Beatles said, "All you need is love." Well, you do need a couple more things than love but not all the excess that we see nowadays!
How do you feel about this? Do you sometimes feel as if you don't measure up? Well guess what? You DO! Maybe not in the eyes of your boss or your neighbor but in the eyes of our Lord. He loves you, thinks that you are wonderful- yes, wonderful, and wants to give you the true desires of your heart.
Know that when you look at someone else and think, "Wow, I wish I had a life like theirs," that they have their issues too and most likely the more "stuff" they have, the less happy they truly are. Be thankful for what you do have, the things you've been blessed with, not what you don't have.
I think that if we could all take a step back and realize that all the "junk" lacks meaning that we'd be a happier society today.
**Can I also add that, to what degree are you willing to go into debt to have all these things? We're in over our heads in our homes, our counties, our states and our nation!**
Tuesday, May 4, 2010
Pink Fawn Designs
The coaster giveaway worked out better than I had expected! As you may know, since Heather never responded, I chose a new winner, The Pink Fawn (a.k.a. Nancy.) Nancy responded and the coasters will soon be on their way to Ontario! I checked out Nancy's website this morning and was pleasantly surprised with what I saw, cute handcrafted items, soaps, lovely fabric and....... AN APRON! I loved a bunch of items on her site (but I loved the apron the best.) Here are a few other of my favorites!
I loved a bunch of items on her site (but I loved the apron the best.) Here are a few other of my favorites!

And fabric....oh, the fabric! Look at the hollyhocks (my personal favorite in the flower department) on this Heather Ross print! Each picture is linked so you can click on the photo and go right to the item in her shop.
Each picture is linked so you can click on the photo and go right to the item in her shop.Thanks for letting me share Nancy and congrats again on the coasters!
Monday, May 3, 2010
new winner!
Well, I never heard from Heather regarding the costers so I chose a new winner this morning!
Random Integer Generator
Here are your random numbers:
18
Timestamp: 2010-05-03 14:10:55 UTC
The Pink Fawn said...
I am a big Heather Ross fan, so I love your coasters! I remember the old VW vans when we used to camp as kids - lots of fun memories.
Keeping my fingers crossed that you can contact me and I can get these out to you! I left a message on your blog! :)
Now, if I'm not contacted by the Pink Fawn by Wed. night I will draw one more winner. After that, these puppies are headed to goodwill! :)
Sunday, May 2, 2010
homestead apron hanger
I'm all about aprons. I love the way they make me feel while I'm in the kitchen or cleaning the house. One of my sewing goals this spring is to make a garden apron that I can wipe my dirty hands on! One of my favorite magazines, Mary Jane's Farm, had a great project in the Jan/Feb 2009 issue that looked something like this....... Almost.
I asked my father in law (who is a cabinet maker) to help me put one together. He ended up making the whole thing. Almost. It really was a 3 person effort. He put together the wooden back splash, I painted it and did the shopping on eBay for the vintage rolling pins, and my husband attached the pins for me. I'd have to say that my part in it was certainly the easiest, and the most fun!
 Almost.
I asked my father in law (who is a cabinet maker) to help me put one together. He ended up making the whole thing. Almost. It really was a 3 person effort. He put together the wooden back splash, I painted it and did the shopping on eBay for the vintage rolling pins, and my husband attached the pins for me. I'd have to say that my part in it was certainly the easiest, and the most fun!
 This will be going into the kitchen to hang my aprons from...which will look much nicer than the little rack they are all rolled up and squished in now.
Subscribe to:
Posts (Atom)
.jpg)


